Battery switch on travel trailer function is crucial for managing your RV’s power. Understanding how your battery switch works is key to preventing costly battery drain and ensuring your appliances run smoothly. This guide will break down the different types of switches, their functions, and how to troubleshoot common problems. We’ll cover everything from basic wiring diagrams to advanced upgrades, empowering you to confidently manage your travel trailer’s electrical system.
We’ll explore various battery switch types, their pros and cons, and how they impact different systems in your RV. You’ll learn how to safely work with your battery switch, perform essential maintenance, and even upgrade to a more sophisticated system if needed. By the end, you’ll be a battery switch expert!
Battery Switch Types in Travel Trailers

Choosing the right battery switch for your travel trailer is crucial for managing your power system effectively and safely. Different types of switches offer varying levels of control and protection, so understanding their differences is key to making an informed decision. This section will explore the common types of battery switches found in RVs and their respective pros and cons.
Single-Pole Battery Switches
A single-pole battery switch is the simplest type. It’s essentially an on/off switch that controls the power flow from a single battery source. Think of it like a light switch for your battery bank. It’s straightforward to use and inexpensive.
| Feature | Application | Cost | Advantages | Disadvantages |
|---|---|---|---|---|
| Simple on/off control | Single battery systems, basic power management | Low | Easy to use, inexpensive | Limited functionality, no isolation of battery banks |
Double-Pole Battery Switches
Double-pole switches offer more control than single-pole switches. They allow you to isolate two battery banks independently. This is useful if you have a house battery and a starting battery, allowing you to disconnect one while keeping the other active.
| Feature | Application | Cost | Advantages | Disadvantages |
|---|---|---|---|---|
| Independent control of two battery banks | Dual battery systems, improved power management | Medium | Improved safety, allows for individual bank isolation | More complex than single-pole switches |
Double-Pole Double-Throw (DPDT) Battery Switches
A DPDT switch offers the most control. It allows you to switch between two different battery banks or combine them for increased power. This is particularly useful for larger RVs or those with significant power demands. Imagine being able to switch between your house batteries and your generator, or combining both for extra power.
| Feature | Application | Cost | Advantages | Disadvantages |
|---|---|---|---|---|
| Switching between or combining two battery banks | Large RV systems, high power demands | High | Maximum flexibility, ability to combine power sources | Most complex to operate, higher initial cost |
Function and Purpose of the Battery Switch
The battery switch in your travel trailer is a crucial component that controls the flow of power between your trailer’s house battery (which powers your interior lights, appliances, and other systems) and your tow vehicle’s battery. It’s essentially a master control for your trailer’s electrical system, allowing you to disconnect the house battery to prevent unwanted drain and protect your sensitive electronics.This switch manages power distribution, ensuring that your house battery isn’t constantly draining even when the trailer isn’t connected to your vehicle.
It also prevents situations where a faulty appliance or a short circuit in the trailer could drain your tow vehicle’s battery. By strategically using the switch, you maintain the health and longevity of both batteries.
Battery Switch Operation and Power Management
The battery switch typically offers several positions: “Off,” which completely disconnects the house battery from the system; “House,” which connects only the house battery to the trailer’s electrical system; “Both,” which connects both the house and vehicle batteries; and sometimes, a “Vehicle” position that only connects the vehicle battery to charge the house battery. The exact positions and labeling may vary slightly depending on the manufacturer and model of the switch.
Moving the switch to the appropriate position ensures that only the desired battery or batteries are supplying power to the trailer’s systems, allowing for precise control over power distribution. Incorrect positioning can lead to unintended battery drain or damage to electronic components. For example, leaving the switch in the “Both” position when the trailer is disconnected from the vehicle can drain both batteries.
Preventing Battery Drain and Protecting Electronics
The primary purpose of the battery switch is to prevent unwanted battery drain. Leaving the house battery connected when the trailer isn’t in use can lead to a completely drained battery, requiring a jump start or external charging. This is especially true if there is a parasitic draw (a small, constant current drain from a faulty appliance or wiring).
The battery switch acts as a safety measure, isolating the house battery and preventing this drain. Furthermore, protecting sensitive electronics is a critical function. A sudden power surge or voltage fluctuation can damage delicate electronics like your refrigerator’s control board or your entertainment system. The switch helps to prevent these issues by allowing you to disconnect the house battery from the system completely, safeguarding your investment in your trailer’s equipment.
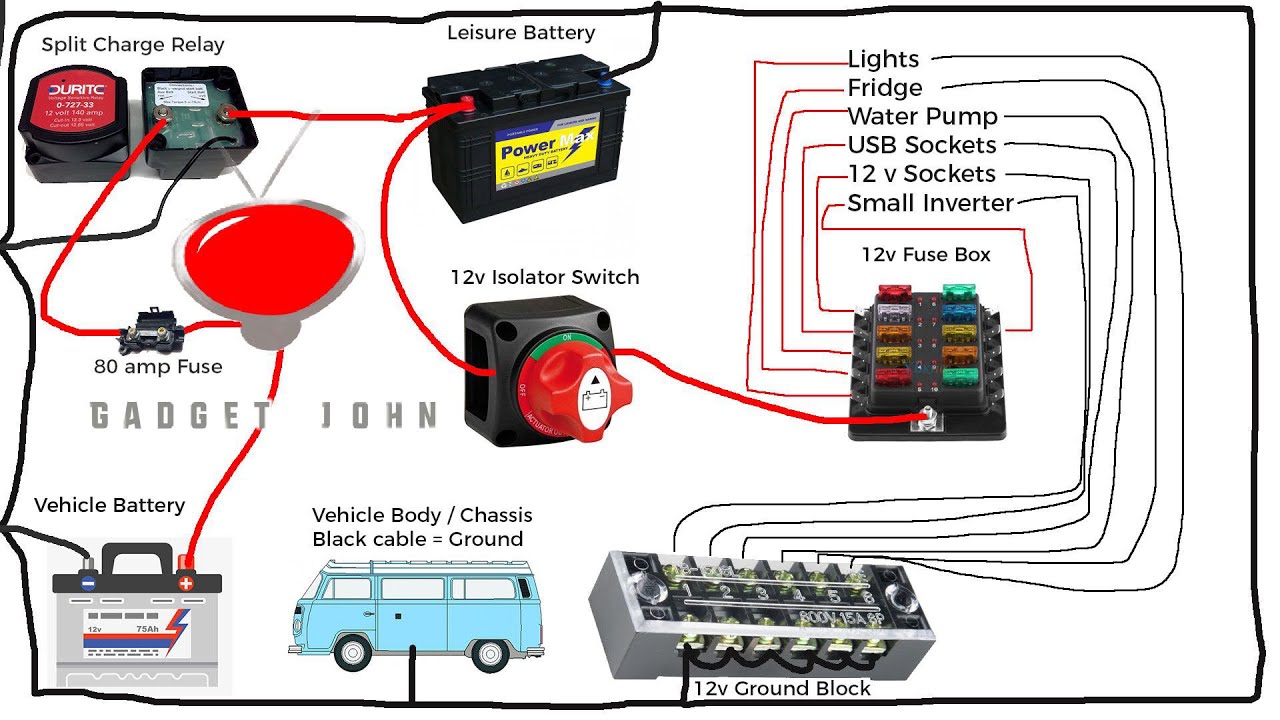
Wiring Diagrams and Schematics
Understanding the wiring in your travel trailer’s electrical system is crucial for safe and effective operation. A clear understanding of how the battery switch interacts with other components will help you troubleshoot problems and make informed decisions about upgrades or modifications. This section will present simplified and more complex wiring diagrams to illustrate these connections.
Simplified Battery Switch Wiring Diagram
This diagram shows the basic connection of a battery switch to the trailer’s battery and main power distribution panel. It’s a good starting point for understanding the fundamental role of the switch.
| Component | Description | Connection |
|---|---|---|
| Battery | 12V Deep Cycle Battery | Positive (+) terminal connected to the battery switch’s input. Negative (-) terminal directly to the chassis ground. |
| Battery Switch | On/Off switch controlling power flow from the battery | Input from battery positive (+), output to the distribution panel. |
| Distribution Panel | Main power distribution point for the trailer | Receives power from the battery switch, distributes power to various circuits. |
Complex Travel Trailer Electrical System Wiring Diagram
This diagram incorporates additional components common in modern travel trailers, showcasing a more realistic representation of the electrical system and how the battery switch plays a central role. This expanded view includes solar panels, a converter, and an inverter.
| Component | Description | Connection |
|---|---|---|
| Solar Panels | Generate DC power from sunlight | Positive (+) and negative (-) wires connected to a charge controller. |
| Charge Controller | Regulates the charging of the battery from the solar panels | Input from solar panels, output to the battery. |
| Battery | 12V Deep Cycle Battery (or battery bank) | Positive (+) terminal connected to the battery switch’s input and the charge controller output. Negative (-) terminal directly to the chassis ground. |
| Battery Switch | On/Off switch controlling power flow from the battery | Input from battery positive (+), output to the distribution panel. |
| Converter | Converts 12V DC power from the battery to 120V AC power | Input from the distribution panel (12V DC), output to the AC outlets. |
| Inverter | Converts 12V DC power from the battery to 120V AC power (typically for higher power demands) | Input from the battery (through a separate circuit, potentially bypassing the battery switch for direct power), output to high-power AC outlets. |
| Distribution Panel | Main power distribution point for the trailer | Receives 12V DC power from the battery switch, distributes power to various circuits; also distributes 120V AC power from the converter. |
Troubleshooting Common Battery Switch Issues
Your travel trailer’s battery switch is a critical component, ensuring you can easily switch between using your trailer’s battery or the campground’s power. Problems with this switch can leave you stranded without power for lights, appliances, or even the water pump. Understanding common issues and how to troubleshoot them is essential for maintaining your RV’s functionality.Troubleshooting a faulty battery switch often involves systematically checking for the most common culprits: corrosion, loose connections, and switch failure itself.
A methodical approach will help you pinpoint the problem quickly and safely.
Corrosion Inspection and Cleaning
Corrosion is a frequent enemy of electrical connections, especially in the damp environment often found around RV batteries. White, green, or blue powdery deposits on the terminals or switch contacts indicate corrosion. This buildup increases resistance, reducing current flow and potentially leading to overheating or complete failure. To inspect for corrosion, carefully examine all connections at the battery switch, including the battery terminals themselves.
Use a wire brush or a specialized battery terminal cleaner to remove the corrosion. For stubborn corrosion, a baking soda and water paste can help loosen it. After cleaning, apply a corrosion inhibitor to prevent future buildup. Remember to disconnect the negative battery cable before working on any electrical components.
Connection Tightness Verification
Loose connections are another common cause of battery switch problems. Over time, vibrations from travel can loosen bolts and nuts, leading to intermittent power or complete loss of functionality. Check all connections at the battery switch and battery terminals for tightness. Tighten any loose connections securely, but avoid over-tightening, which can damage the terminals or bolts. If you find any damaged or stripped bolts, replace them immediately.
Battery Switch Functionality Testing
To directly test the switch, you’ll need a multimeter. First, disconnect the negative battery cable. Then, set your multimeter to measure DC voltage. Place one multimeter lead on each side of the switch, and turn the switch to the “on” position. If the multimeter reads the battery’s voltage (typically around 12.6V for a fully charged battery), the switch is working correctly.
If you get a low reading or no reading at all, the switch itself might be faulty and needs replacing. Remember to reconnect the negative cable after testing.
Wiring Continuity Examination
Beyond the switch itself, problems can lie within the wiring. A multimeter can also help check for continuity in the wiring. With the switch in the “on” position, use the multimeter’s continuity setting to test the circuit from the battery to the load (e.g., a light or appliance). A continuous beep indicates a good connection. If there’s no beep, there’s a break in the wiring somewhere that needs to be traced and repaired.
This might involve checking for damaged or corroded wires, loose connections in the wiring harness, or even a blown fuse.
Safety Precautions and Best Practices
Working with your travel trailer’s electrical system, especially the battery switch, requires caution. Improper handling can lead to serious injury from electric shock, burns, or even explosions from the battery. Always prioritize safety to prevent accidents and ensure the longevity of your equipment.Disconnecting the battery before any work is paramount. This simple step prevents accidental shorts, protects you from electrical hazards, and safeguards sensitive electronic components in your trailer.
Even seemingly minor tasks should be preceded by this crucial safety measure.
Battery Switch Disconnection Procedures
Before working on any part of your travel trailer’s electrical system, including the battery switch itself, you must disconnect the battery. This involves removing the negative (-) cable first, then the positive (+) cable. Use a wrench of the appropriate size to loosen the cable clamps securely attached to the battery terminals. Always ensure the cables are completely disconnected before proceeding with any maintenance or repairs.
When reconnecting, reverse the process, attaching the positive (+) cable first, followed by the negative (-) cable.
Maintaining the Battery Switch
Regular inspection and cleaning of your battery switch is essential for optimal performance and safety. Inspect the switch for any signs of corrosion, loose connections, or damage. Clean any corrosion from the terminals using a wire brush and a battery terminal cleaner. Apply a corrosion inhibitor to the terminals after cleaning to prevent future corrosion. Regularly check the switch’s operation to ensure it’s switching the battery power on and off correctly.
A malfunctioning switch can lead to unexpected power outages or, worse, electrical fires.
Working Safely with the Electrical System
Always wear appropriate safety gear when working with the electrical system. This includes safety glasses to protect your eyes from sparks or flying debris, and insulated gloves to protect your hands from electric shock. If you are unsure about any aspect of the work, consult a qualified electrician. Never work on the electrical system in wet or damp conditions.
Water is a conductor of electricity, increasing the risk of electric shock.
So, you’re planning a trip? Awesome! Before you jet off, remember travel insurance is key. Check out this link for Aon travel insurance options: aon travel insurance – they’ve got various plans to suit different needs and budgets. Then, once you’ve compared a few, you can head over to aon travel insurance to review the policy details before you buy.
Making sure you’re covered is super important, so don’t skip this step!
Safe Battery Handling, Battery switch on travel trailer function
Batteries produce flammable hydrogen gas. Ensure adequate ventilation when working near batteries. Never allow sparks or flames near a battery, and avoid wearing loose clothing or jewelry that could accidentally come into contact with the terminals. Always store and transport batteries upright to prevent spills of corrosive battery acid. Neutralize any spilled acid immediately with baking soda and water.
If acid comes into contact with your skin or eyes, flush the area with copious amounts of water and seek immediate medical attention.
Upgrading or Replacing the Battery Switch: Battery Switch On Travel Trailer Function
Upgrading your travel trailer’s battery switch can significantly improve convenience and monitoring capabilities. Switching to a more advanced model offers features like remote control or digital displays, providing greater control and insight into your battery’s health. This process, while involving some electrical work, is manageable with basic DIY skills and careful attention to safety.Replacing a faulty or outdated switch is equally important for ensuring reliable power and preventing potential electrical issues.
A malfunctioning switch can lead to power disruptions, premature battery drain, or even safety hazards. This section will guide you through the process of safely upgrading or replacing your battery switch, regardless of your existing setup.
Battery Switch Removal and Installation
Before starting any work, always disconnect the negative battery terminal. This crucial safety step prevents accidental shocks or short circuits. Once disconnected, carefully remove the old switch. This typically involves unscrewing mounting bolts or brackets and disconnecting the wiring harness. Take photos or make detailed notes of the wiring connections before disconnecting anything – this will be invaluable during reinstallation.
When installing the new switch, ensure it’s securely mounted and that all connections are tight. Remember to reconnect the negative battery terminal only after all connections are verified.
Connecting the New Switch to the Existing Wiring Harness
The wiring harness connection is the most critical part of the upgrade. Most battery switches use a standard configuration, but always double-check the wiring diagram for both your old and new switch to ensure compatibility. Generally, you’ll have wires for the battery positive (+), the load (appliances), and possibly a ground (-). Carefully match the wires from your old switch to the corresponding terminals on the new switch.
If your new switch has additional terminals (for remote control, monitoring, etc.), consult the manufacturer’s instructions for proper connection. Use appropriately sized wire nuts or crimp connectors to secure the connections. Ensure all connections are snug and free of loose wires to prevent arcing or short circuits.
So, you’re planning a trip? Awesome! Before you jet off, remember travel insurance is key. Check out the details on Aon travel insurance for a wide range of coverage options. They often have great deals, but you should also compare it with other providers, maybe even looking at the policies available through Aon travel insurance to ensure you’re getting the best value for your money.
Don’t leave home without it!
Upgrading to a Remote Control or Digital Monitoring Switch
Upgrading to a switch with remote control capabilities adds a layer of convenience. These switches allow you to control your battery bank from a distance, often via a small wireless remote. The installation process is similar to a standard switch replacement, but you’ll need to connect the remote control receiver to the switch according to the manufacturer’s instructions.
This typically involves connecting the receiver to a power source and then pairing it with the remote. Digital monitoring switches offer a more sophisticated approach. These switches often incorporate a digital display showing battery voltage, current draw, and state of charge. Installation involves connecting the switch to the battery and the load, and potentially to a shunt for more accurate current monitoring.
The shunt is a low-resistance device placed in the battery circuit that accurately measures the current flow. Always follow the manufacturer’s instructions for your specific switch model. Improper installation can damage the switch or your battery bank.
Battery Switch and its Impact on Different Travel Trailer Systems
The battery switch is the central control point for your travel trailer’s DC power system. Understanding its impact on various systems is crucial for safe and efficient operation. A simple flick of the switch can determine whether your lights shine, your water pump gurgles, and your appliances function. This section details how the battery switch interacts with different systems and how different switch configurations affect power management.The battery switch acts as a gatekeeper, controlling the flow of power from your trailer’s battery (or batteries) to the various DC-powered components.
When the switch is in the “on” position, power flows freely, enabling the operation of lights, water pumps, and other 12-volt appliances. Conversely, when the switch is “off,” the power is cut, preventing battery drain when the trailer isn’t in use. This simple action prevents your battery from being completely drained, especially during periods of extended storage. The interaction with other electrical components is primarily about the power supply; the battery switch is upstream of most other electrical devices in the DC system.
Lighting Systems
With the battery switch in the “on” position, power flows directly to the trailer’s lighting circuits. This allows interior and exterior lights to function correctly. Different lighting systems (LED, incandescent) will draw varying amounts of current, but the battery switch manages this flow, preventing overloads (provided the wiring is correctly sized). If the battery switch is off, all lights are inoperative.
A properly functioning switch ensures consistent illumination regardless of whether you’re plugged into shore power or relying solely on battery power.
Appliance Operation
Many travel trailer appliances, such as water pumps, fans, and some refrigerators (those running on 12V DC), are directly powered by the trailer battery. The battery switch controls the power to these appliances. Turning the switch off prevents these appliances from draining the battery when not needed. For example, if the water pump is left running inadvertently, a functioning battery switch allows you to quickly cut the power, preventing battery depletion.
Water Pump Functionality
The water pump, crucial for providing water to sinks and showers, is typically directly connected to the battery via the battery switch. Switching the battery to the “off” position immediately stops the water pump, preventing unnecessary battery drain. This is particularly important because water pumps can draw significant current, rapidly depleting the battery if left running unintentionally. A properly functioning battery switch ensures that you can control this high-current draw effectively.
Different Battery Switch Configurations and Their Effects
Different battery switches offer varying levels of control. A simple on/off switch provides basic control. More advanced switches might include positions for connecting to shore power, connecting to a second battery, or isolating batteries completely. For instance, a dual-battery switch allows for selecting either battery, both batteries, or neither. This enhances power management by allowing the use of one battery for house functions while conserving the other for starting the tow vehicle.
Such configurations optimize energy usage and extend the life of your batteries. A poorly configured or malfunctioning switch, however, can lead to unexpected power outages or even damage to electrical components.
Mastering your travel trailer’s battery switch is a vital skill for any RVer. From understanding its basic function to troubleshooting potential issues, this guide has provided you with the knowledge and confidence to maintain your RV’s electrical system. Remember to prioritize safety when working with electricity, and don’t hesitate to consult a professional if you’re unsure about any step.
Happy travels!
FAQ Insights
What happens if my battery switch is left in the OFF position?
Leaving the switch off completely disconnects both your house and vehicle batteries, preventing any power from flowing to your trailer’s systems. This is good for long-term storage to prevent drain but means nothing works.
How often should I check my battery switch for corrosion?
Inspect your battery switch at least twice a year, or more often if you’re in a humid climate. Corrosion can significantly impact performance.
Can I use a different type of battery switch than what came with my trailer?
You can, but ensure the amperage rating is sufficient for your system’s needs and that it’s compatible with your wiring setup. Consult a professional if you are unsure.
My battery switch is making clicking noises. What’s wrong?
Clicking often indicates a loose connection or a failing switch. Check connections first, and if the problem persists, replace the switch.
